If you're a marketer or business owner, email marketing is something you need to get right.
Over the years, I've avoided email marketing and left so much revenue on the table because of it.
According to CampaignMonitor 4400% ROI and $44 for every $1 spent.source
I don't know about you but that is an ROI I can get behind.
What Is ConvertKit? ConvertKit is an email marketing software that allows bloggers, podcasters, and other creators to build an email list. ConvertKit makes capturing more leads and selling more products with email marketing easy to do and fast to learn. Popular among small business owners, ConvertKit has powerful marketing automation without the vast cost.
Need A ConvertKit Account? Create One Now
ConvertKit Pricing
ConvertKit prices start at $29 per month for up to 1,000 subscribers. As the email list grows, monthly pricing adjusts to the next pricing tier ranging up to $3,999 per month. ConvertKit also offers a 14-day free trial for first-time signups.
- Up To 1,000 Subscribers ($29/month or $288/yr)
- Up To 5,000 Subscribers ($79/month or $768/yr)
- Up To 10,000 Subscribers ($119/month or $1,188/yr)
- Up To 50,000 Subscribers ($379/month or $3,792/yr)
Check ConvertKits Full Pricing
Unlike some other email marketing tools, there is unfortunately no free version for ConvertKit. However, the starting plan is currently only $29/month.
Now, if that seems like a lot to you, think of these stats.
- Email has an average ROI of $38 for each $1 spent. A big increase over the 24.93 reported in 2013.
- One in five companies report an ROI of over 70:1 aka 7,000% ROI
source
Email marketing has an NROI of around 4,300% (according to the Direct Marketing Association).
Does ConvertKit Have Landing Pages & Forms?
ConvertKit comes with a landing page and form builder that requires no coding knowledge. The simple drag and drop editor allows fully responsive templates to be edited and used. Advanced users custom CSS can be used to customize landing pages beyond the limits of the builder. For small business owners that have no coding knowledge and don't want to deal with the pain of outsourcing, ConvertKits landing page & form builder is powerful enough for most needs.
Will ConvertKit Work With Squarespace & Wordpress?
ConvertKit provides a snippet of code that can apply landing pages & forms to any CMS such as Squarespace and Wordpress. Custom domains are also able to be added, allowing landing pages hosted on ConvertKit servers but accessible from the marketer's domain.
At this point most of your questions should be answered in the rest of the post I'm going to walk you through learning ConvertKit step-by-step.
If you perfer video content, I've filmed a tutorial video, for those of you that perfer written content, keep reading.
Need A ConvertKit Account? Create One Now
ConvertKit Terms
Before we dive into the step-by-step guide, you first need to understand a few terms that ConvertKit uses.
When I first started with ConvertKit, I used tools such as Aweber and Mailchimp so certain menu items that ConvertKit uses were a bit confusing.
However, now that I’ve used it for so long I wouldn’t have it any other way.
Terms
Each tool uses different terms to describe their features. So, before we dive in I thought it would be helpful to give you a glossary:
- Form: How a subscriber joins your list. Enter a name and email address and you’re subscribed!
- Landing Page: It’s like a form, but with more content and design.
- Sequence: A series of emails sent automatically based on subscription date. MailChimp calls them automation. Aweber calls them follow-up sequences. Infusionsoft calls them campaigns. Other tools call them autoresponders.
- Broadcast: A one-time email sent to a specific group of subscribers (or your entire audience). These are called campaigns in MailChimp.
- Subscriber: Someone who gives you their email address to receive updates. Subscribers are account-wide with a single profile. This means as you add data, it all goes into one profile rather than creating duplicate subscribers across lists.
- Tag: This is a bit of metadata added to a subscribers profile to track their activity or preferences. Tags can be used to keep track of purchases and what a subscriber is interested in (e.g. design vs marketing), how engaged they are (clicked a link in a launch sequence) and where they were imported from. A subscriber can have an unlimited number of tags.
- Segment: A saved selection of any combination of forms, sequences, and tags. This makes it easy to access later for sending a broadcast or viewing the total number of subscribers. Segments never have duplicate subscribers even if the subscriber is in multiple sources for that segment. Source:
Getting Started With ConvertKit
Now, before we continue much further into this post, it’s important that you have a ConvertKit account. So, if you haven’t done so already, create one now.
Need A ConvertKit Account? Create One Now
After you have created your account, you will have to make sure to add your physical address. This is required to be CAN-SPAM compliant. 
One thing you have to make sure of is that you can receive physical mail at this address, so don’t go putting in a fake address.
If you don’t currently have a physical office, you can either get a virtual office, P.O. Box or a more expensive option, a UPS box.
After you’ve submitted your physical address info, you’ll then need to get your account approved before being able to mail.
This will usually take 24-48 hours during the business week, but you can also email them to speed things up.
To answer the question, ‘why do I need to get my account approved?’ Go here.
Creating a Form
Now that your account is setup, you’ll need a way to collect your visitor’s contact information, so that you can send them emails later.

First, you’ll need to click the “Forms” button in the top menu.
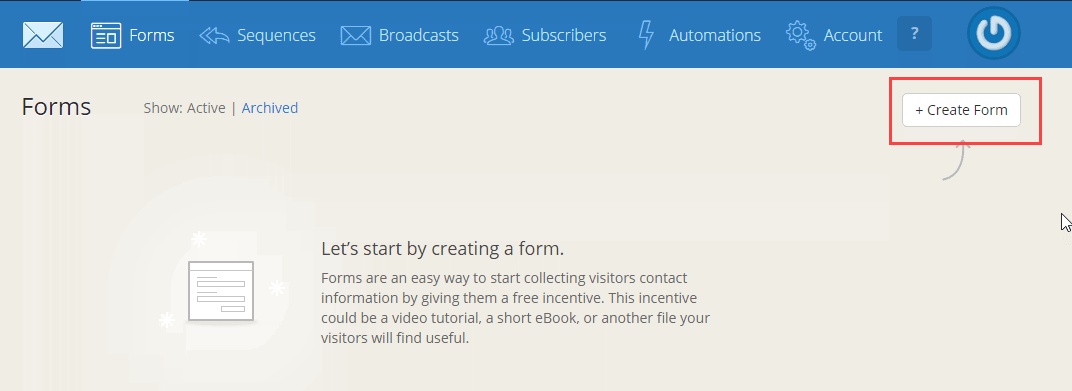
Once you do that, you’ll see a “Create Form” button at the top right.
As the name suggests, this is where you’ll want to click each time you create a new form.
Landing Page Creator

You’ll then be prompted to either create a landing page or a simple form.
If you are just getting started and aren’t very versed in HTML, CSS, etc, creating a landing page with ConvertKit is the best way to go.
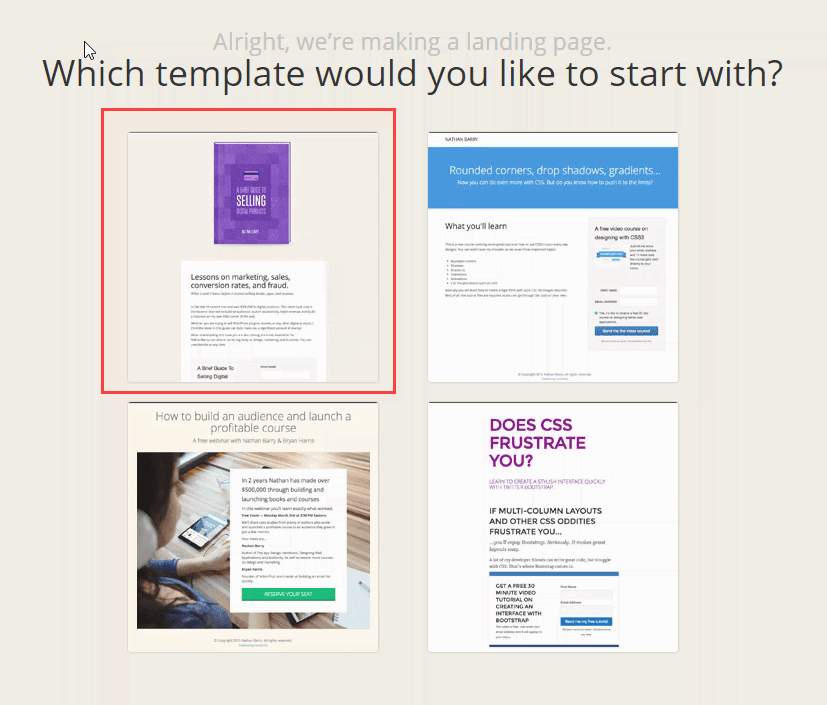
Currently, ConvertKit only has four landing page templates, but these are more than enough to get you started capturing emails.
Select the template that you think looks the best with what your offering your visitors.
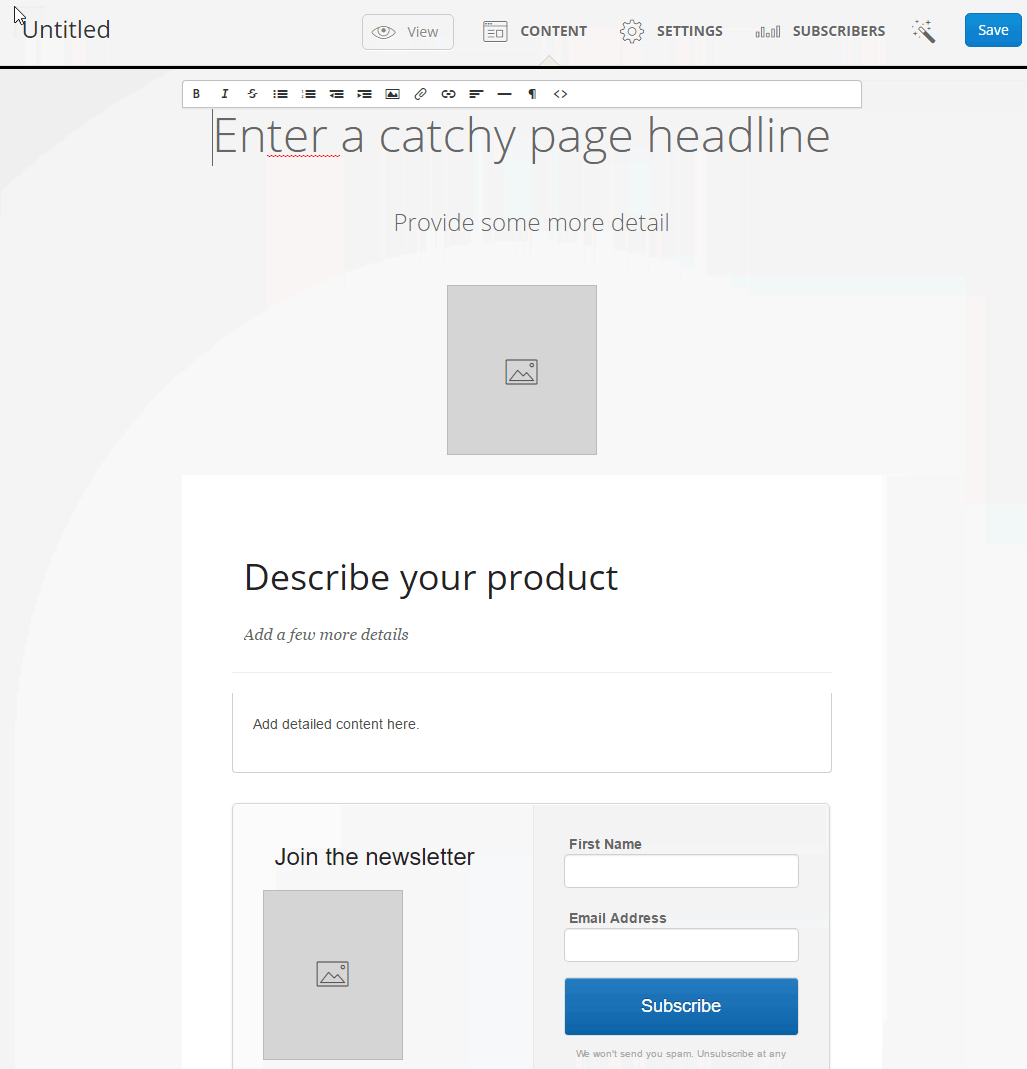
The ConvertKit landing page editor is a simple but limited “drag & click” editor.
Simply, click on what part of the landing page you want to edit and add all of your marketing messaging.
This allows you to create landing pages very easily, but they will be limited in customization options.

The editor does, however, allow you to edit the various colors of your landing page by clicking the “magic wand” in the top right of the sub menu.

If you’d like to see how your landing page looks “live” simply, click the view button to see your landing page in the browser.

Once everything looks the way you like it, be sure to press the save button up in the top-right corner.

Now, that you have your landing page the way you want it, you need to edit a few of the settings on your form.
To do this, click on the “settings” tab in the sub menu.

1) The first setting you’ll want to change is the landing page name.
I recommend coming up with a naming convention that will allow you to keep landing pages and forms organized and allow you to scale easily.
Personally, the naming convention I use is [Site] Post Name (Type).
So, for example, one of my forms is named like this: [PPCMode] Launch Planning (Content Upgrade)
This allows me to quickly find a form/landing page quickly if I ever need to edit it.
2) You’ll need to decide is if you’d like to have ConvertKit host your landing page or if you’d like to embed it on your site.
Personally, I like to have all of my landing pages for a specific project on my main domain name, but having ConvertKit host the page is a bit easier.
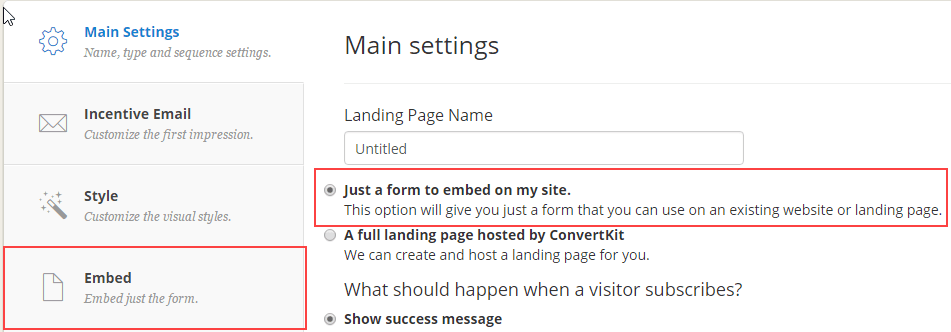
If you do decide that you’d like to embed the form on your site, just leave the radio button checked as an embed.
In the left-hand menu, click on the “Embed” button to grab your embed code.
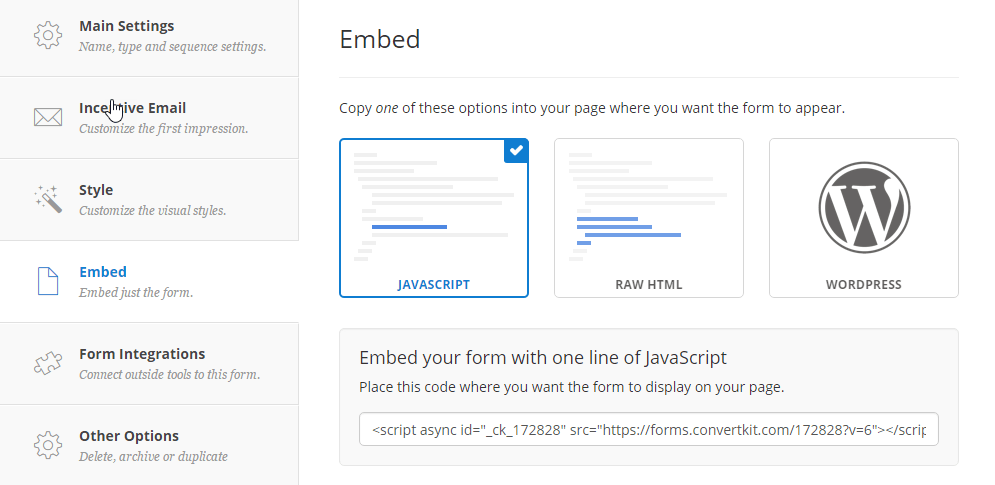
The simplest way to get your landing page embedded is to just use the Javascript code; unless, you have WordPress in which ConvertKit has a very easy to use plugin.
For a bit more advanced users, you can also get the raw HTML from your landing page which makes a great starting point if you are interested in making your landing page a bit more custom.
3) You’ll need to decide what you want to do with your new subscriber after they’ve subscribed to your offer.
I suggest redirecting the visitor to a thank you page, which will allow you to pixel them so you can retarget to them later if needed.
By redirecting the visitor to a thank you page, this allows you to guide them on how to confirm their subscription if you are using double opt-in.
It can also inform them on what kind of emails you’ll be sending them in the future.
If you need some more ideas on what to do with a thank you page, check out these thank you page examples.
4) The last setting allows you to offer to your new subscriber the option of being placed on a sequence (autoresponder).
I haven’t used this option as I automatically add my subscribers to various custom sequences based on what they show interest in.
I’ll show you how I do this in the automation section later in this guide.
5) Finally, after you’ve made all of your changes, be sure to click the “Save Landing Page” button. This isn’t required if you keep switching between menu items on the left-hand side, but I do suggest getting in the habit of saving frequently. Nothing is worse than losing your work and having to redo it.
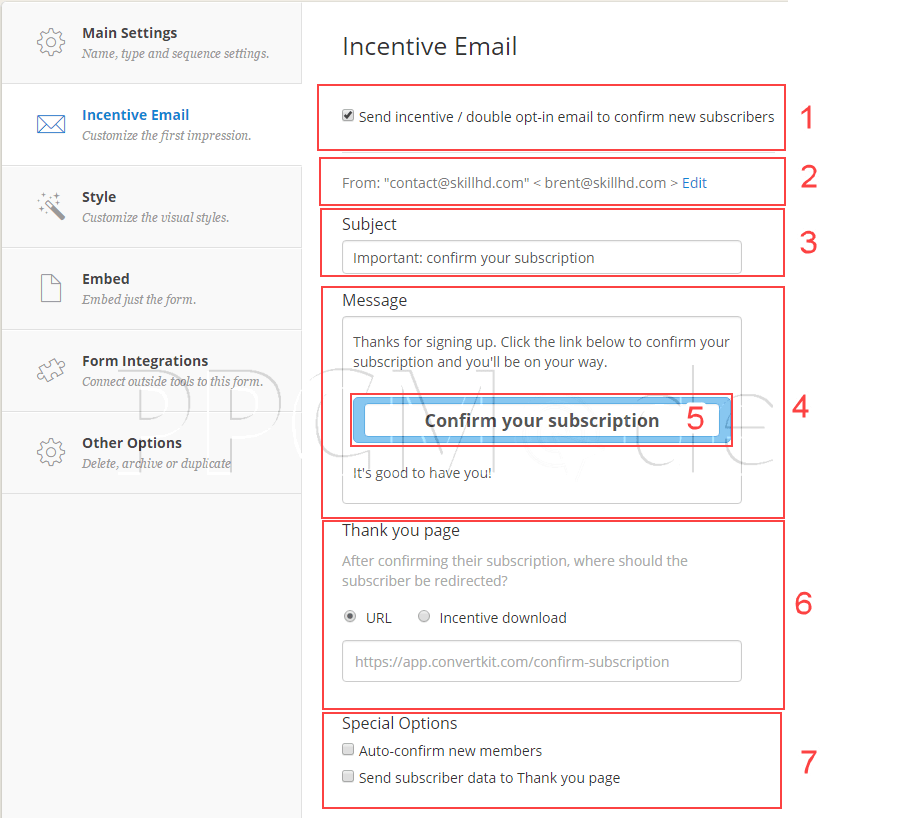
Incentive Email
1) If you are going to send the subscriber any type of lead magnet or want them to double opt-in, you’ll want to leave this box checked.
2)In this box, you can customize the sender name and email address which is very helpful if you plan on using your account with multiple blogs or authors.
Just make sure that it’s an email that you will actually be able to receive emails that your subscribers send.
Replying to your subscribers and building rapport with them is extremely important.
3) This is the subject line of the first email that your subscribers will get.
Usually, if you have enticed them to signup to your list with the use of a lead magnet, it’s best to title your subject line something like this: [Download] Your Requested E-Book, etc.
4) In the message body, this is your chance to make sure that your new subscriber actually double opt-in now or downloads your lead magnet.
5) The text of your confirm/download button can be changed and it’s what your subscriber must click on. So, something like, Download My Ebook, is much more enticing than simply saying ‘confirm your subscription’.
6) Now, you need to choose what to do with the subscriber after they’ve clicked on the opt-in button. You can either send them to a thank you page asking them to complete further actions or if you used a lead magnet, you can send them directly to download your offer.
7) If you decide you’d like to auto-confirm, aka opt-in new subscribers, regardless of if they click the confirm button or not, you’ll want to check the Auto-confirm new member’s box. I personally use this check-box when I’m providing a lead magnet to my subscribers, but still, want them to be single opt-ins.
You can also send your subscriber data directly to your thank you page. This will allow you to have dynamic text such as your subscriber’s name, email or any other information you’ve collected.
Styles
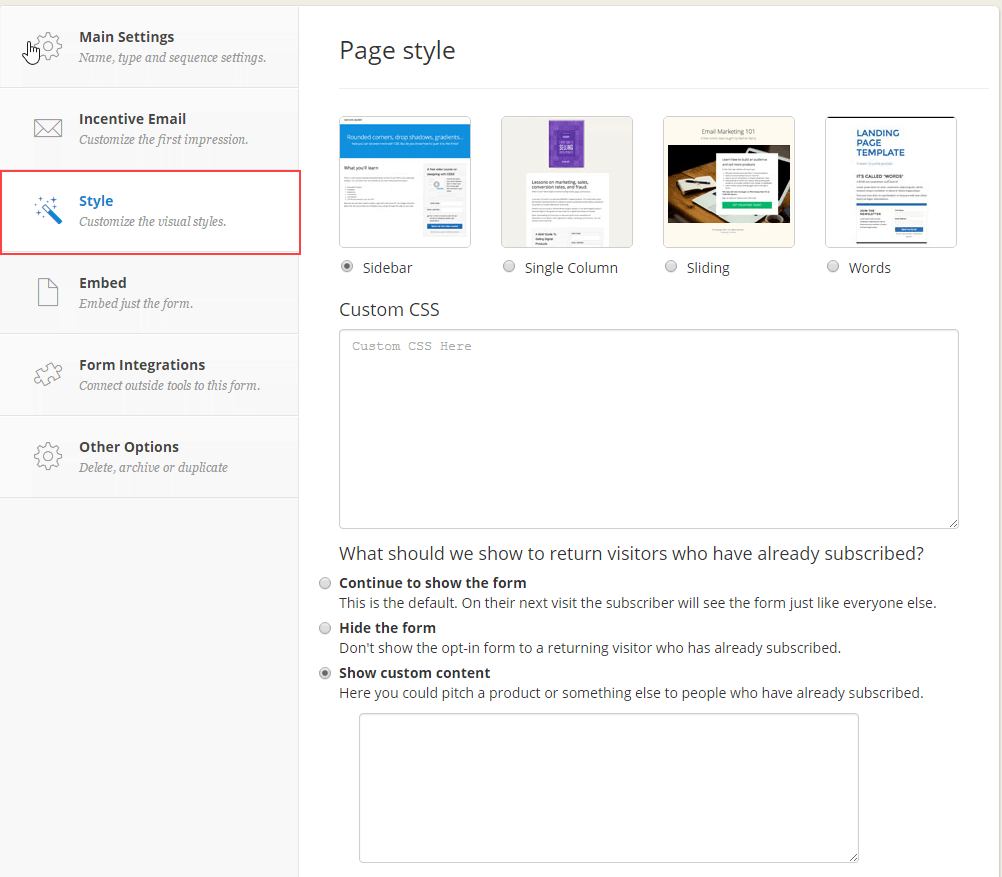
Under “Style” in the left-hand menu, you’ll have the option to change your landing page to one of the other three template styles if you’ve changed your mind.
You’ll also be able to add custom CSS which makes adding some custom styling on ConvertKit hosted landing pages a breeze.
Finally, you have the option on what you want to do if the visitor has already subscribed to that particular landing page. This is pretty powerful as it allows you to show custom content if the visitor has already subscribed to your offer.
Think of showing a theme of one of your products, or perhaps even a similar offer that you think they’d be interested in.
Be sure to test this as I’ve had people reach out to me asking how to resubscribe to something because they misplaced my lead magnet on their computer.
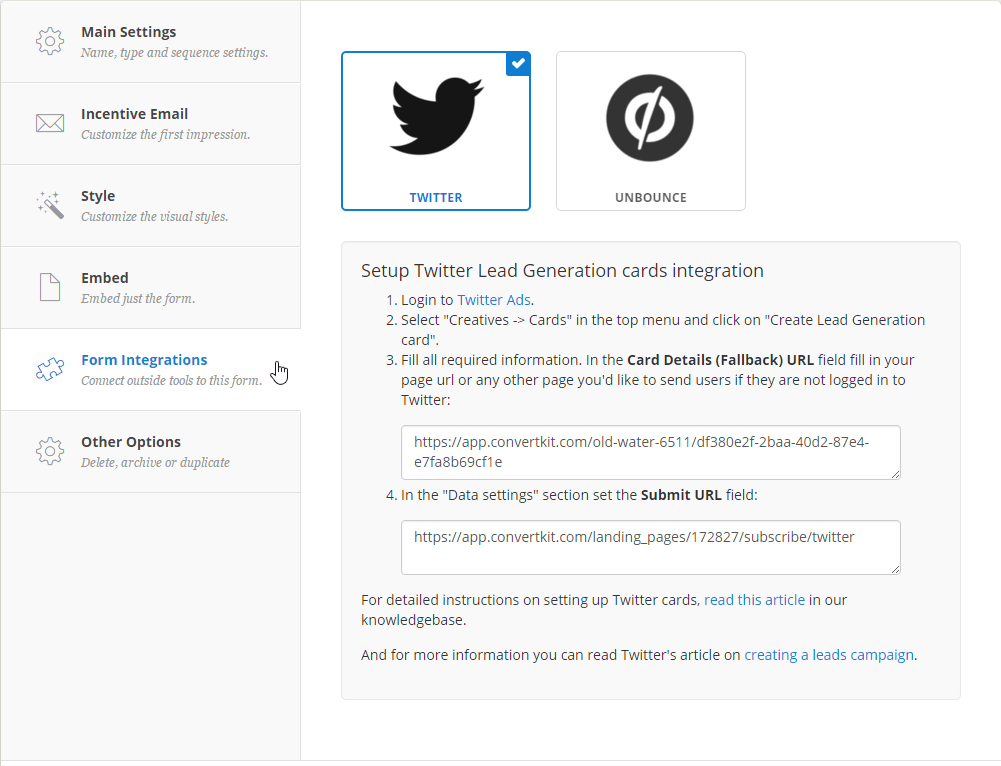
Form Integrations
Another thing that is great about ConvertKit is all of its integrations.
If you plan to run Twitter Lead Generation cards, then this is the place you’ll want to visit to get the correct URLs.
Also, ConvertKit also integrates directly with Unbounce. So, if you need a bit of a higher end landing page builder, Unbounce would be a great choice.

Other Options
Last but not least, is the “Other Options” menu item. This is the place to visit if you plan to create a split test or need to duplicate your landing page or form.
You can also archive the form if you are no longer sending traffic to it or simply delete it if you are positive you no longer need it.
Styling Your Form
Personally, I use a two-step opt-in process by using SumoMe, but ConvertKit allows you to create forms & landing pages.
As you’ll see on PPCMode, I have several overlay boxes depending on various things you click, or if you scroll down the page sometimes there is a “scroll box”.
I personally create these opt-in forms with SumoMe because of the split testing/reporting capabilities.
But if you are on a budget, ConvertKit has got you covered by allowing you to do many of these forms directly with ConvertKit.
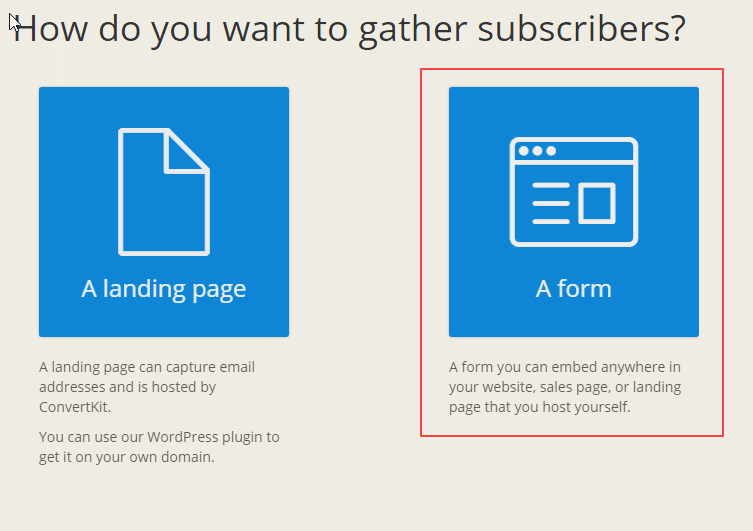
Once you click the “create form” button in the form menu tab like I showed you earlier, you’ll see the promote to create a landing page or form. This time we are going to create a form.

After selecting the form, you’ll be able to choose which style you’d like to use. Don’t worry, you’ll be able to change this later.

Since we’ve already gone over how to create landing pages, many of the settings are similar to forms as well. I’m only going to demonstrate what is different.
First, click on the settings tab in the submenu.
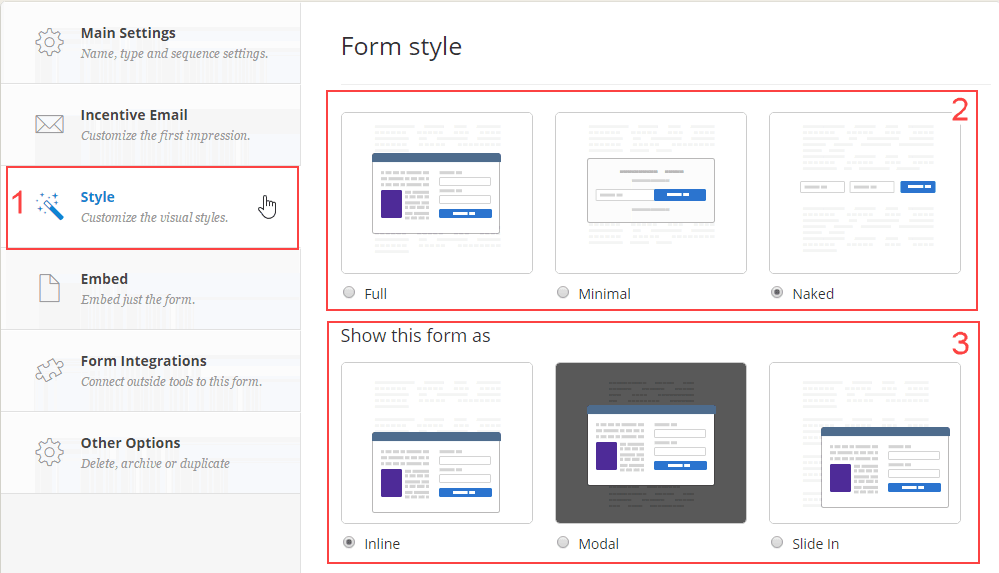
1) Once you click on the “Style” tab on the left-hand side, you’ll see some new options for form styles.
2) These are the same three styles that you were able to choose from earlier, but if you decided to make a change you can easily do so.
3) Inline, Modals and Slide Ins are pretty much all you’ll need to have for various lead capture forms on your website
Sequences
Now as mentioned earlier:
Sequence: A series of emails sent automatically based on subscription date. MailChimp calls them automations. Aweber calls them follow-up sequences. Infusionsoft calls them campaigns. Other tools call them autoresponders.
**Lead Nurturing Aside: Creating a sequence is a way to stay in contact with your leads. This is very valuable when you’re wanting to lead nurture your subscribers by providing them with more information based on where they are in the buying process.
For Example**: **Imagine you were interested in buying a new couch, but still not sure on exactly what you wanted. If I started providing you relevant info which helped you determine which couch was right for you, you’d likely be more willing to buy from me, since I provided you with valuable information.
Lead nurturing is extremely valuable in affiliate marketing because it allows us to create a direct relationship with our audience that we otherwise wouldn’t have if we simply sent them off to whichever offer we were promoting at the time. By capturing information upfront and providing information this allows you the ability to convert a single subscriber multiple times by showing them relevant products and services, that you otherwise wouldn’t be able to do.
**

To create your first sequence, click on “Sequences” in the main menu.
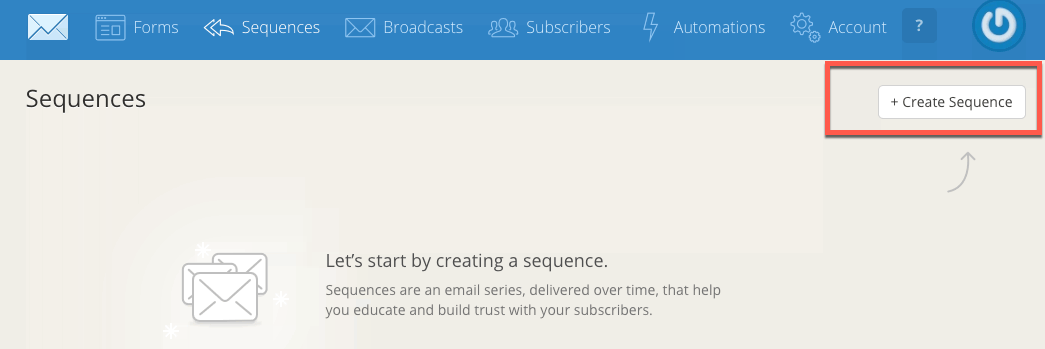
Next, click on the “Create Sequence” button up in the top right corner.
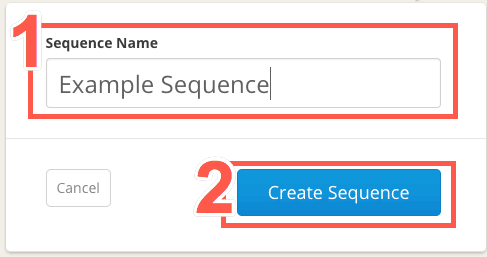
- Now, name your sequence. You will be able to change this later as well if you decide to use a different naming convention later.
- Click on “Create Sequence”

You now have a new sub-menu that should be defaulted to the “content” section.
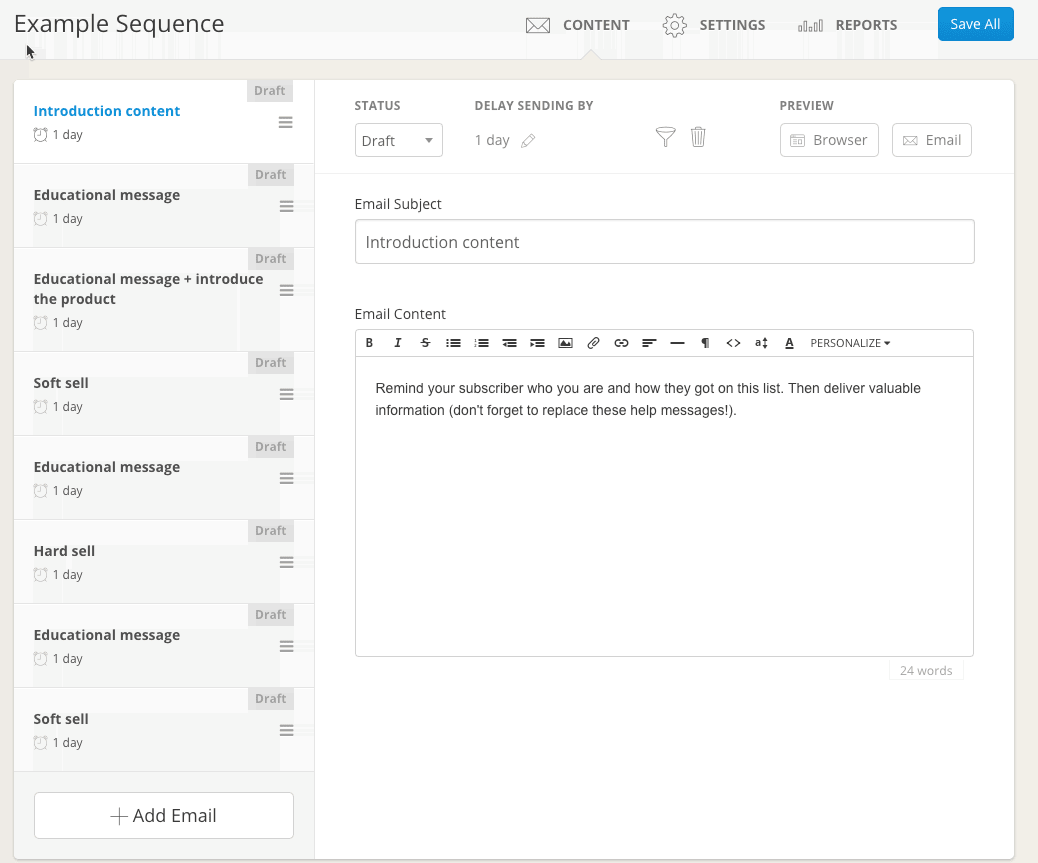
As you can see, there is quite a bit going on here at first glance.
Some of it is self explanatory, while others will likely be over looked by most users.
So, lets break it down.
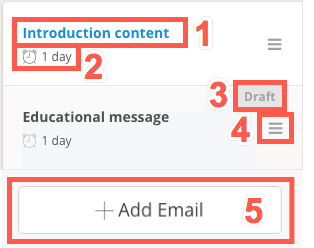
To the left side, you should see a list of template emails.
- This will be the subject line of this particular email in the sequence.
- How many days after the previous email, the next e-mail will be sent.
- If it shows “Draft” here, this current email isn’t live and will not be sent to subscribers until it is published.
- Clicking this allows you to drag and drop to rearrange the order of this particular email in the sequence
- To add more emails to the sequence click here.
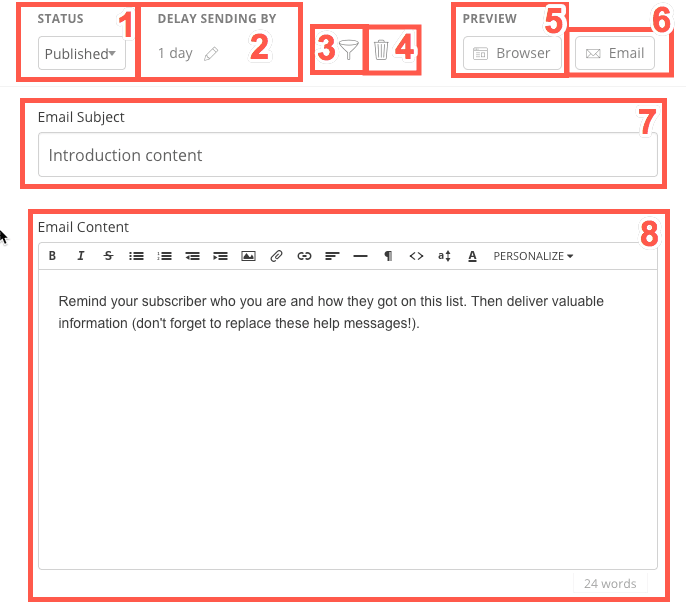
- This is where you’ll select either “Published” to make the email in the sequence live or select “Draft” if you don’t want it to be sent to subscribers yet.
- Changing this will change how long this particular email will be delayed since the previous email. If it’s the first email in the sequence this will be from the time that the subscriber first was added to this particular sequence.
- This is where you’ll filter who you’d like to see these emails (It’s more advanced so I’ll be going into how to use these filters in further detail later on in this post )
- Pressing the trash can icon will delete this particular email in the sequence.
- If you want to preview your work, click the “browser” button and it’ll bring up your email in HTML format in a separate window.
- Clicking “email” will allow you to preview your current work by sending the email to a single email address.
- As the box states, this is where you’ll edit this particular emails subject line
- This is where you’ll edit the content of the email. There are a few ninja things that I’m going to share with you later in this guide for this section as well.

Now, in the sub-menu you’ll want to click on “Settings”.
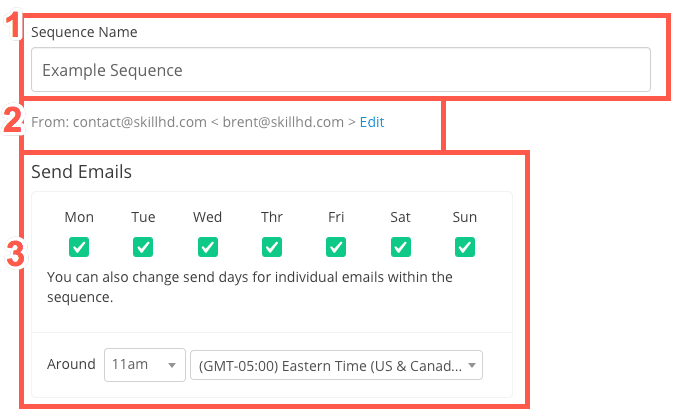
At the very top of the settings tab, you should see Sequence Name.
- This is where you are going to name your entire sequence of emails. For my properties, I personally make a custom sequence for several of my most popular posts. I’ll have a naming convention that is something like this – [Post] Post Name – Level 0 — I’ll explain the level 0 a bit later 😉
- Depending on where the subscribers of this sequence subscribed from, this is the e-mail you want to use
- Here you can set the sequence to only send on certain days of the week and send the emails at a specific time.

Now, you can select which email template you want to use for your sequence.
I personally am a fan of text only because I feel like it makes your emails more natural, however, only you will know what your list responds best to.
If you do plan on using a template, I suggest that you make sure that it’s mobile responsive.
- 54% of all emails are opened on a mobile device
- 75% of Gmail’s 900M users access their accounts via mobile devices.
Source
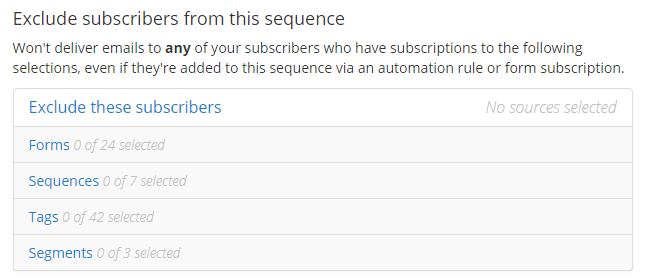
The next setting available in sequences allows you to exclude certain subscribers depending on other forms, sequences, tags and even segments they’re part of.
This is very powerful as it helps you better serve your list.
Example: If someone signs up to a beginner list which adds them to a beginner sequence.
But then signs up to your advanced list, you can then stop sending the beginner emails by excluding anyone that joins the advanced list.

The last menu item in sequences is Reports.
Now
This section will be blank until you start having people sign-up to your form and ultimately your sequence.
Here is an example of one of my sequences:

On the left, you can see total number of subscribers that has completed the entire sequence plus the total number of unsubscribers.
At first, these stats confused me because they don’t lineup.
But, what I realized is that the total unsubscribers that unsubbed from my list is for any email that I sent, not just from the sequence.
On the right, you can see important KPIs for each individual email: such as open rate, click rate, how many people got that email (sends) and how many people unsubscribed.
This data is important because if you see one particular email with either a low CTR or a high amount of unsubscribes you may need to rewrite it.
Broadcasts
Next up on the main menu is Broadcasts.

Personally, these are where I make the bulk of the money I generate from my email lists.
Broadcasts allow you to easily send an email to your entire list or a segment of your list depending on your goals.

This is your broadcast dashboard that shows all of the broadcasts you sent on this particular ConvertKit account.
Since at this point you likely haven’t sent a broadcast yet, it’ll likely be blank.
Let me go ahead and go into the details of this screen, then I’ll teach you how to create a broadcast.
- Once you’ve sent a broadcast, you’ll see some important data. We can see when the broadcast was completed, both data and time while also see the KPI’s of that particular broadcast.
- If we want to get more information about this particular email broadcast, we can do so by clicking on the View Report button.
- To create a new broadcast, we’ll click on the + New Broadcast button.

We are now in the Recipients section of creating our new broadcast.
This is where we can determine who is going to receive our broadcast and also select who the broadcast is from.
- If you have multiple email address that you’d like to send a broadcast from, such as multiple employees or even different websites, this is where you would do it. I personally suggest having a new ConvertKit account for each of your projects as it keeps things cleaner, however, that is up to you.
- The total number of subscribers that the broadcast will currently be sent to. As we add targeting options, this number will update in real time.
- This is where we can narrow down our targeting to include and exclude subscribers based on different parameters.
How To Select Your Subscribers
I can honestly write an entire post on all the different things you can do with subscriber rules, but for now I’ll give you enough information to get your wheels turning.

First, you need to choose if you’d like all the rules or any of the rules to apply.
All: means that if a particular subscriber has the tag: Guide – yet you selected that you want the subscribers to have the tags Guide and Email = that subscriber wouldn’t be selected.
Any: In the example aboves means even if you had the tags Guide and Email the subscriber with only one of those tags would be selected.
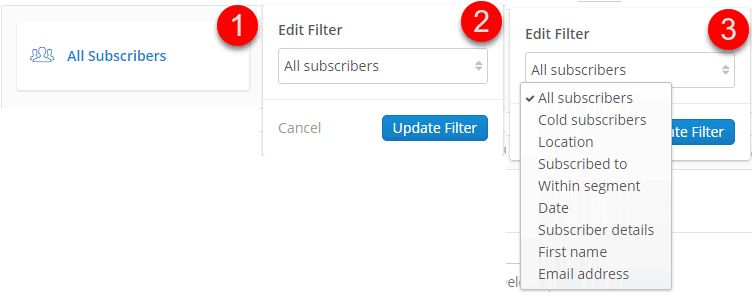
We are now going to create our first filter:
- Click on All Subscribers.
- A new box should popup called Edit Filter. Click on the drop-down labeled All subscribers.
- You now have several options available on how to filter your subscribers.
- Cold **subscribers**: Anyone who hasn’t opened or clicked an email in the last 90 days and has been subscribed for at least 30 days.
- Location: You can select subscribers based on how close they live to a particular city (awesome for local events.)
- Subscribed To: This is the type of filter I use the most. It allows you to select people who have signed up to specific forms, **sequences and tags.**
- Within segment: Usually you put different subscribers in different segments depending on which autoresponder they’re currently part of.
- Date: If you want to reach out to subscribers who just recently joined your list or visa-versa this is a great way to do it.
- Subscriber details: If your forms have custom fields such as asking them for their company name, marketing budget, etc this is how you’d filter them.
- First Name: As it sounds, you can filter people based on name. I haven’t really found a use for this yet, but would love to hear in the comments what you’ve come up with.
- Email address: Much like First Name you can filter by email address. I usually filter based on @gmail.com, @yahoo.com etc if I know one email type has a better delivery than another for that particular TLD.
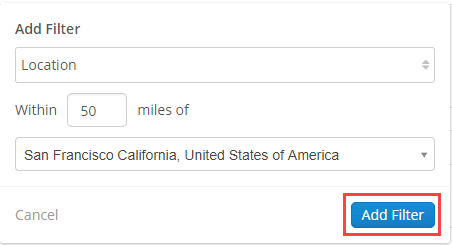
Now,
To give you an example, we are going to create a filter that is selecting all subscribers within a 50 mile radius of San Francisco.
After inputting our settings, we’ll click on Add Filter.
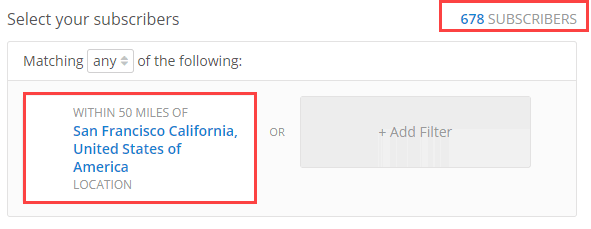
We can now see that our new filter has been added.
Our Subscriber amount has also changed to reflect how many people on our list live within 50 miles of San Francisco.
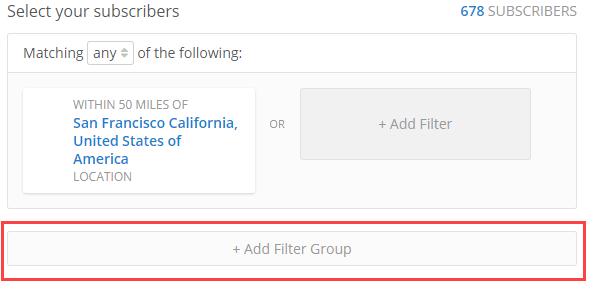
To improve upon this example, say that we now want to exclude any cold subscribers from our broadcast.
First we’ll want to click on + Add Filter Group.

Be sure to select Matching None of the following.
Then select Cold Subscribers from the drop down menu.

We can once again see that the amount of our subscribers has decreased from 678 down to 608.
Our entire filter settings looks good, so now we’ll click on Next Step.
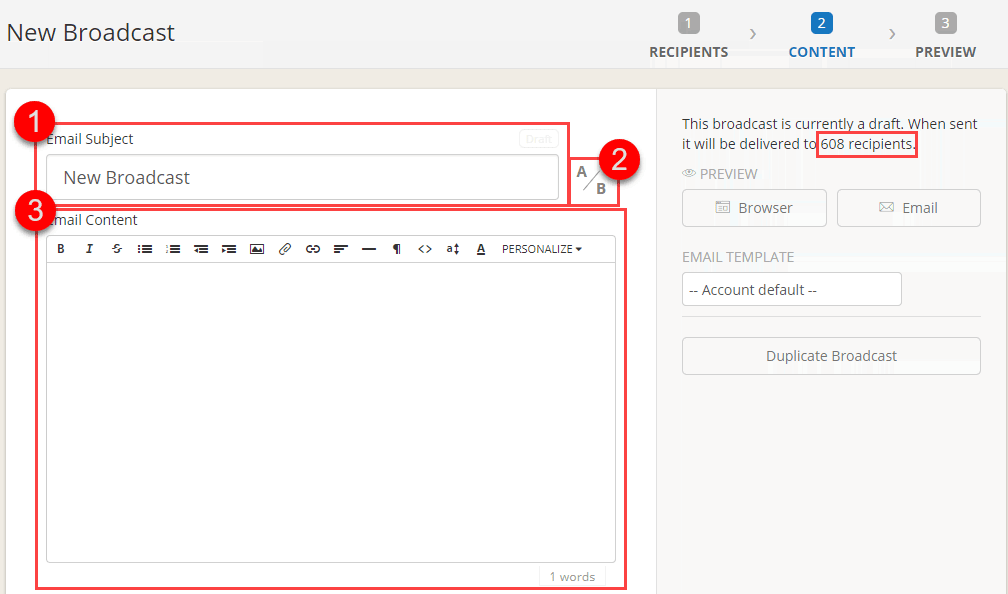
On the next screen, this is where you’ll write your actual broadcast email.
- This will be the subject line of your broadcast email.
- Clicking on the A/B button will allow you to split test multiple headlines for your broadcast. Each variation will be sent to 15% of subscribers, then the winning variation will be sent to 70% of subscribers after 4 hours.
- The is where the body of your email will be written.

After you’ve written your email and subject line(s), click Next Step down in the bottom right.
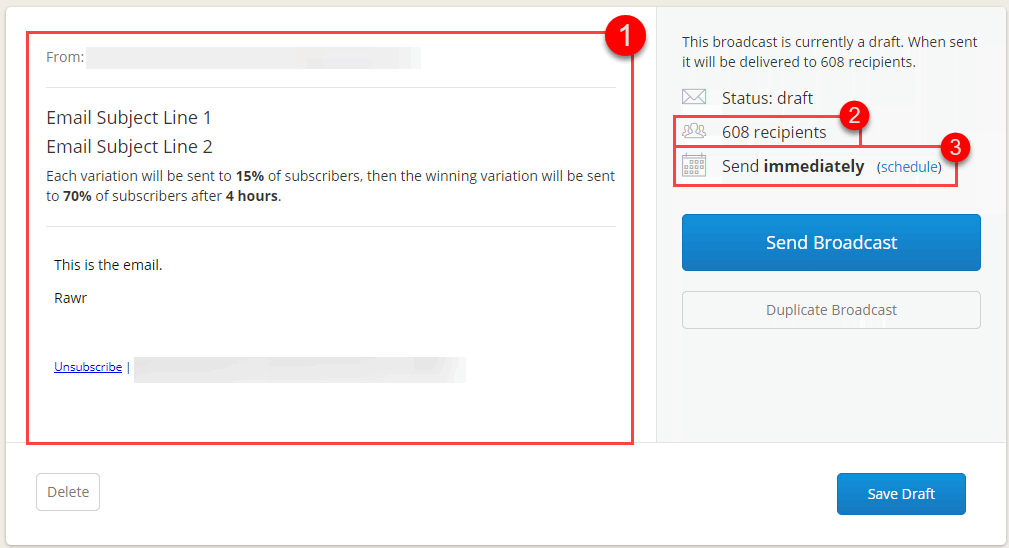
- This is a preview of your broadcast email.
- How many recipients will recieve the email.
- Currently, if we press Send Broadcast it will be sent out right away.

If you want to schedule your broadcast, simply press on Schedule and select the time & date that you’d like the broadcast to be scheduled.
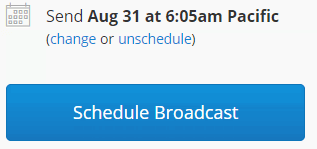
We can now schedule the broadcast for Aug 31 at 6:05am.
Subscribers
Next up on the main menu is Subscribers.

The subscribers section allows you too..
You guessed it.
Manage your subscribers.
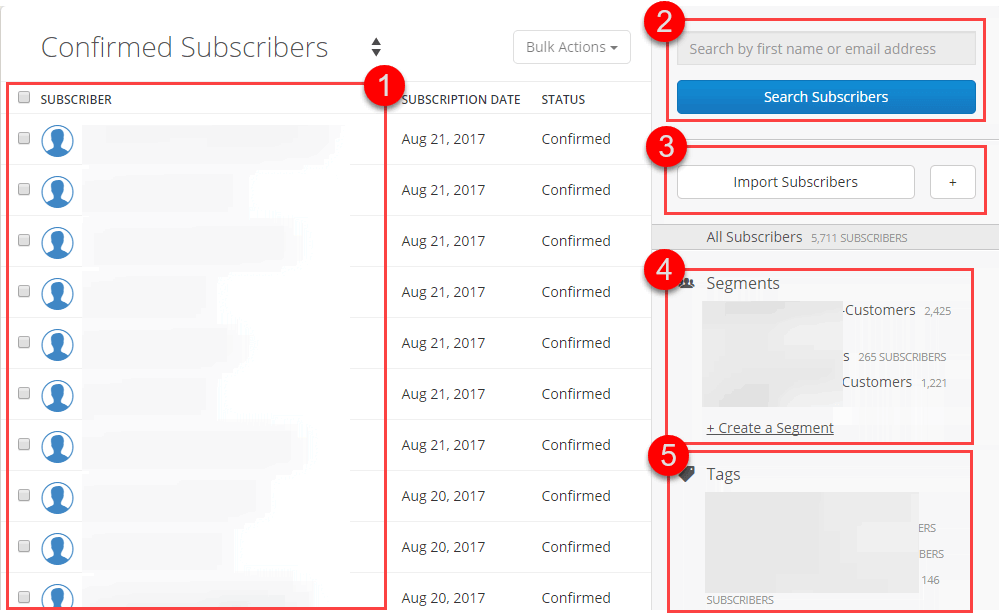
When you first go to the subcribers dashboard, you’ll be presented with a few things.
- This will be a list of your current subscribers, when they subscribed and their current status.
- Allows you to search for specific subscribers based on name or email address.
- Is where you import existing subscribers from an email list on something like Aweber or Mailchimp. If you click the + button, this will allow you to manually add a subscriber.
- This section allows you to see all of your current segments and how many of your subscribers are in each segment. You can also create a new segment by clicking on +Create a Segment.
- Just like segments, this section allows you to see all of your current tags and how many subscribers are attached to each tag. This is also where you are able to create new tags, by clicking on + Create a Tag.
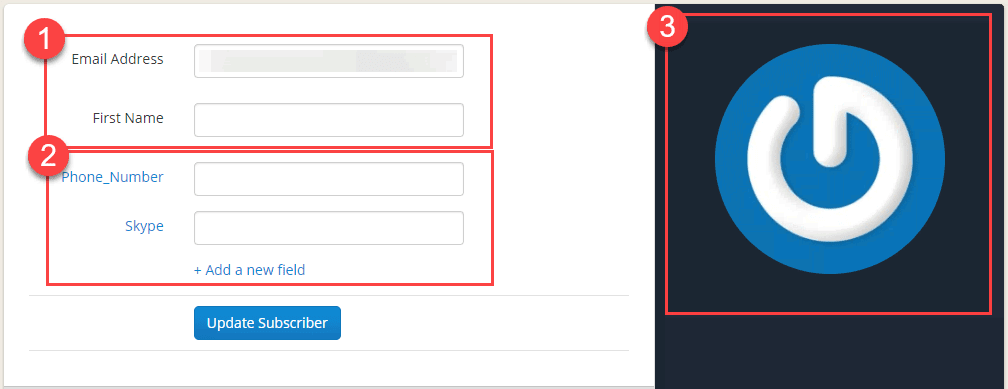
If you click on a specific subscriber in your subscribers list, you’ll bring up a screen giving you more details about that subscriber.
- You will see the default ConvertKit information, such as first name and email.
- Is where you’ll see any custom data fields you’d like to collect from your subscribers. You can add a new data field by pressing + Add a new field. When doing this, the new field will be added to every current and future subscriber on your list.
- If your subscriber has a Gravatar setup, you’ll be able to see a picture of them.
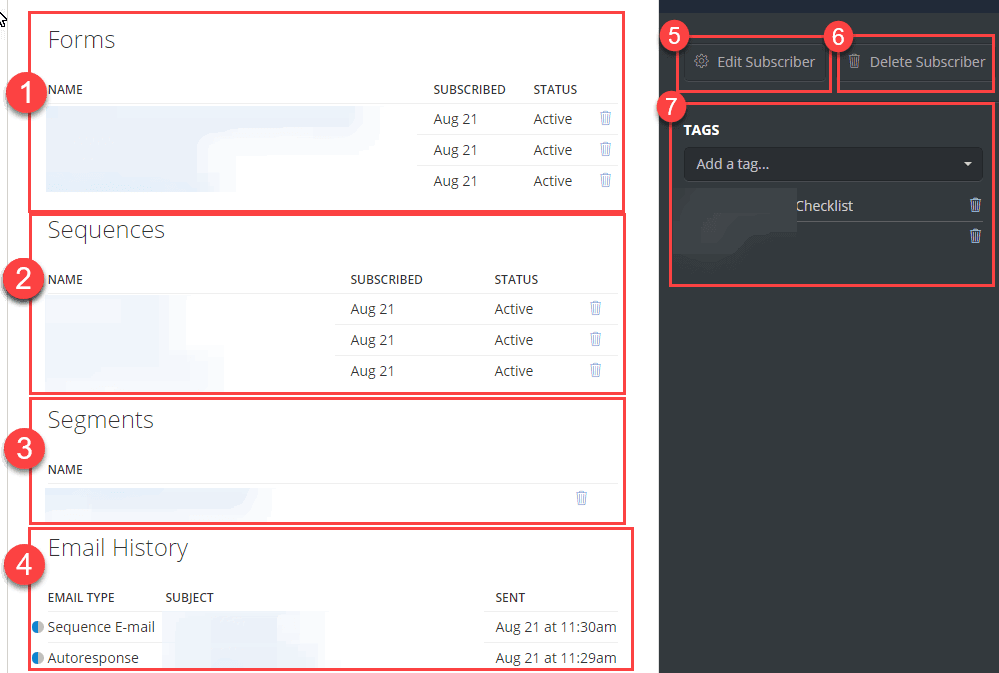
If we scroll down further, we have even more details about this particular subscriber.
- We can see all the various forms that they subscribed to and when.
- Which sequences they are a part of and when they were added to them.
- The segments that they currently fall under.
- An email history of every email they’ve received and how they responded to it: Delivers, Opened, Clicked, etc and when.
- If we need to edit any of the information about the subscriber, we can do so here.
- For whatever reason, if you need to delete the subscriber, click here.
- Here is all the current tags this particular subscriber is part of. You can also add and delete tags that the subscriber is apart of here.
Automations
Next up on the main menu is Automations.

One of my favorite things about ConvertKit is the fact that it allows you to do so much with automation.
Here is how ConvertKit themselves explains it:
Automation rules are not applied retroactively or to in-app actions. An automation will only be applied to subscriber-based actions that occur after the automation was created.
They also have great documentation on how to use ConvertKit Automation Blueprints.
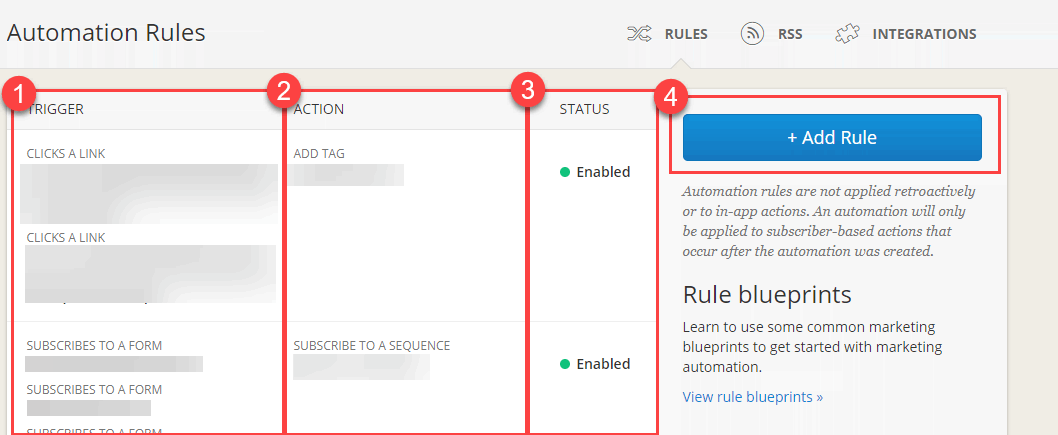
When inside the Automation Rules section, there is a list of all of your current rules.
- The trigger column is what the subscriber must do to start the rule.
- After the rule has been triggered, the Action is what you want the automation to do.
- Status is if the rule is currently enable or disabled.
- To create a new rule click on + Add Rule.
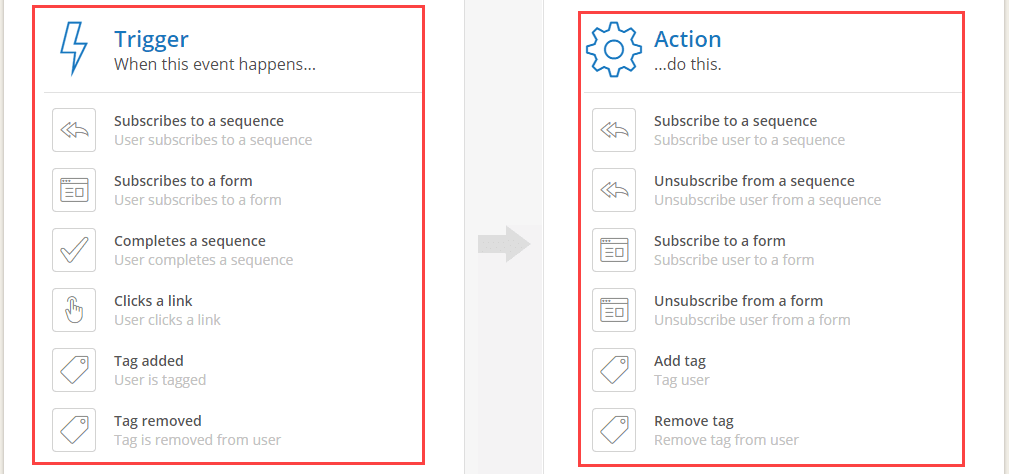
To create a rule you’ll see 2 columns:
What event happens (Trigger) and what you want ConvertKit to do (Action).
Obviously, there are a TON of different things you can do with automation rules, but I’ll show you a few examples of how I personally use it.
Tagging Based on Links Clicked
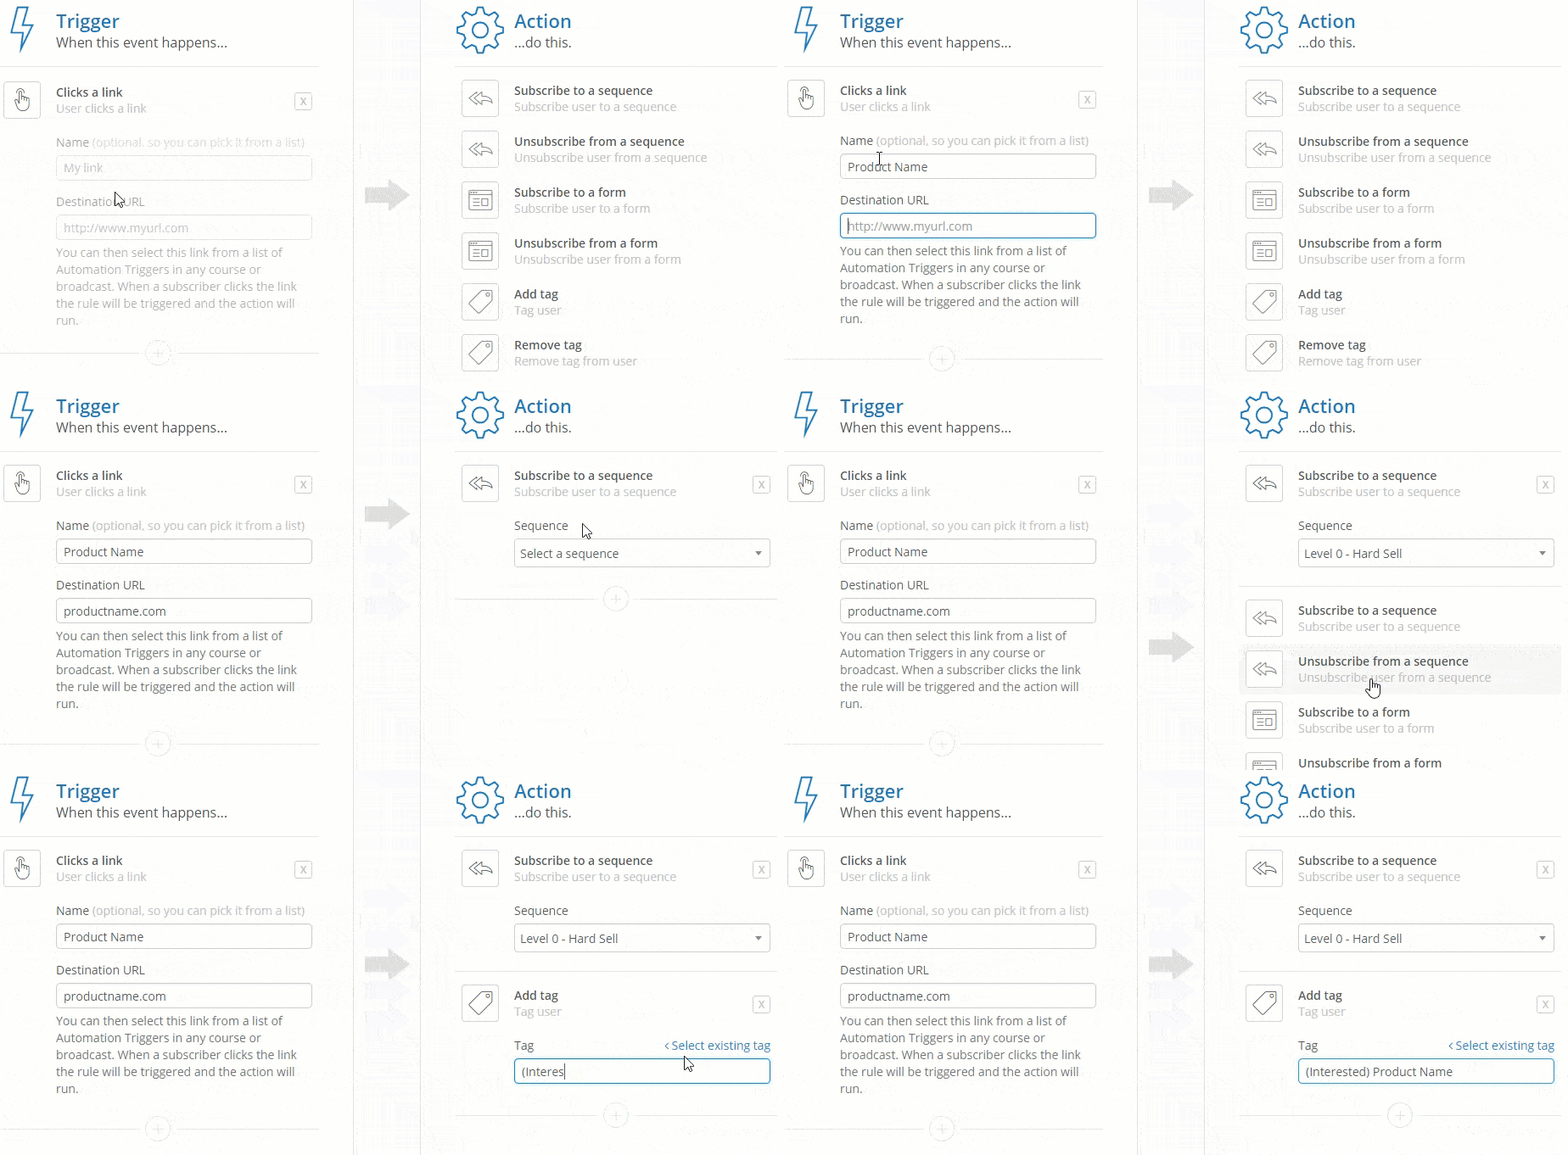
As you can see above, I created a rule that when a subscriber clicks a link, it adds them to a sequence & tags them.
This allows me to put a link to a specific product in my broadcast or sequence emails.
Then, if a subscriber clicks on the link, I can add them to a custom sequence that sends them more information about that particular product.
I also tag them with something like this (Interested) Product Name.
This allows me to easily send my subscribers broadcast emails about the product or similar products in the future.
Automations – RSS Feeds
This isn’t a feature that I use very much, but ConvertKit allows you to automatically send emails based on your RSS feed.

In the automation sub-menu, simply click on RSS.

- You’ll see any feeds that you’ve already created, if the feed is currently enabled or disabled and which days it will be broadcasted.
- To create a new automation feed, simply click on the + Add Feed button.

- First up, you need to add a link to your feed. Usually, this will be /feed if you’re using a CMS such as WordPress.
- Click on Check feed and give it a few moments.

If your feed is valid, more information / settings will popup.
- This is a preview of your broadcast from your RSS. This preview will update in real time as you make adjustments to other settings. You also can select which email address you’d like the broadcasts to be sent from.
- You can either select Single which will send an email about one individual post or Digest which will broadcast multiple blog posts into one.
- Just like in broadcasts and sequences, this will allow you to filter which subscribers will get these broadcasts based on your various subscriber tags, etc.
- If you’d like to have a different email template than your other emails, you can select it here.
- For those of you that want to automate the entire process, be sure to check this box so that your emails will be auto sent on the day you specify.
Once you’ve selected your settings, simply press Save and your automated RSS broadcast is ready to go.
Automations – Intergrations

One great thing about ConvertKit, is all of the integrations they have.
I personally use integrations such as SumoMe & Thinkific here on PPCMode plus several others on my other properties.
However, writing a guide on each and every one of these integrations is literally a post within itself.
So, I suggest you take a look at ConvertKits Integrations List to see if they have what you need.